Pages

Sunday, June 27, 2010

Bird's Nest

It's a bird's MESS!

You will need:
There is no set list of materials you'll need for this project. Part of the fun is talking about birds and what things they might use to make a nest and to go on a hunt to find them in your yard. (or on a walk through your neighborhood) The items we used:

  • Twigs
  • Hay
  • Grass
  • Feathers
  • Moss
Our collection of materials found in the yard.

And where we cheated (not that it helped us at all):
  • Yarn
  • Clay magic modeling clay

How to:
The challenge was to create our own bird's nest from materials we found in the yard. We did cheat a bit (well, a lot) by starting off with a bit of clay that we molded into the shape of a bowl. Then we just started randomly sticking the other materials into the bowl to make a nest.

Thoughts:
All hail the bird! Trying to make a bird's nest proved a huge challenge and gave me a whole new respect for a creature without opposable thumbs who can build a perfect little bowl of sticks....

An actual bird's nest. Amazing! I have a whole new respect for creatures who can build this with their beaks!

Our nest was an absolute disaster and Elliott had to cup his hands around it just to get it to stay together long enough for a decent picture. My vision of buying little fake birds to place inside our nest and displaying it proudly somewhere in the house was quickly crushed.


HOWEVER, (I put it in all caps, just to keep your attention, lest you were planning on not trying this project.) this craft was a big success as far as a fun time goes. I took the opportunity to check out a few bird books at the library beforehand and we spent days talking about birds and ways they could build nests. (Plus it helped that some Robins were building one in the front yard.) Elliott had so much fun collecting items for the nest. Even our neighbors got into the act and found some pieces he might be able to use. He had me in stitches (What exactly does that mean?) when he started to talk to a bird and I heard him asking, "What do you use in your nest?  How do you get it to stay together? Talk to me!" 

Needless to say the bird did not respond. If he had we might have had better luck.

Monday, June 21, 2010

Grassy-hoppers

A super-cute way to welcome Spring!


You will need:
  • Cardboard egg carton
  • Green paint
  • Googly eyes
  • Pipe cleaners (We used black and white.)
  • Soil
  • Grass seed
  • Black marker
  • Glue


How to:
  1. Cut egg carton into three-cup pieces.
  2. Paint outside of cups green. Let dry.
  3. Attach googly eyes with glue. Draw a smiley face with marker.
  4. Shape pipe cleaners into antennae and legs. Attach to carton with glue.
  5. Place small amount of soil in each cup. (Don't fill it to the top! Leave enough room for water.)
  6. Sprinkle each cup with grass seed.
  7. Place in a sunny spot and water daily. (Sprouts should show up after a few days.)


Thoughts:
This was a really cute project and reminded me (daily) that Spring was right around the corner. The cardboard egg cartons are very absorbent, so it's important to remember to water your seeds every day. (I'm not sure if Styrofoam cartons would work, so if anyone tries, let me know.)

Tuesday, June 15, 2010

Leprechaun Trap

Make a trap to capture a leprechaun on St. Patrick's Day!


You will need:
  • Tissue Box (Ironically enough, finding an empty tissue box during cold season is not a problem in this house!)
  • Gold paint
  • St. Patrick's Day stickers
  • Pipe cleaners (optional)
How to:
I can't take credit for this craft. My friend, Carla, had a St. Paddy's Day party and the kids made these fun traps.
  1. Paint empty tissue box gold. Let dry.
  2. Decorate with stickers.
  3. If desired, make a ladder out of pipe cleaners, so your leprechaun can be more easily enticed into the trap.
The story:
Leprechauns are notoriously clever and extremely hard to catch. However, they appreciate a good try, and are willing to leave special treats to anyone who attempts to catch them.

Thoughts:
We had a lot of fun with this trap and I only just recently was able to sneak it into the recycle bin after telling Elliott it "tore" and my husband(?) that it was "time to let it go". We set our trap out on St. Patrick's Eve, leaving some coins around to "lure" a leprechaun into it. We were not successful in catching one, but we did find out that we do have a local leprechaun named Finnegan who left us some stickers and chocolate coins after taking the money we laid out for him. (He also turned our milk green, which Elliott refused to drink.) We will definitely be repeating this craft each year.

Friday, June 11, 2010

Bean Frame

A craptastic way to show off your favorite photos!

You will need:
  • Plain, wooden picture frames (We found ours in the dollar bin at Michael's Crafts.)
  • Assortment of beans (Walmart sells a bag of mixed beans for around $2.)
  • Glue

How to:
  1. Apply glue to one section of frame at a time. (It's a slow process. Focus on a little bit at a time.)
  2. Add beans.
  3. Let dry.


Thoughts:
We got this idea from a great kid's book called Seeds! Seeds! Seeds! by Nancy Wallace. Elliott lost interest in gluing the beans on after 20 minutes or so, so we spread this craft out into a three day project. Gluing the beans on did get a little tedious. Near the end he got so bored he ended up just pouring the beans on to the glue and we shook off whatever didn't stick. (It looked just as good.) Despite the boredom, he did enjoy making this frame and it actually looks really cute.

When Elliott got a little sidetracked, I used the opportunity to let him sort the different types of beans. He especially enjoyed finding ones that he eats. (Which would be two: peas and chickpeas.) As an added bonus, he actually tried a new bean after making this frame-the Lima bean. He wasn't a fan, but trying something new is a win in my eyes.

Sunday, June 6, 2010

Gloop


Fun! Fun! Fun!


You will need:
  • 2 cups cornstarch
  • 1 cup water
  • 2 drops food color (optional)

How to:
  1. Mix ingredients together in a large bowl.
  2. Play!


Thoughts:
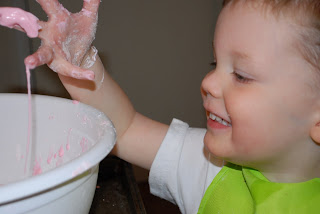
I cannot recommend this "science project" enough. Elliott (and I) had so much fun playing with this. It is impossible to keep your hands off of the gloop. Cornstarch does some crazy things when mixed with water. When sitting in the bowl, gloop looks liquidy (Yes, I know that's not a word, thank you, spell check.) but when you touch it, it's actually kind of rubbery. Pick it up and (the coolest part!) it forms into a kind of slime and drips back into the bowl. Roll it in your hand and it turns powdery. All things to keep in mind when trying to teach your kids about textures. Try this one! You will not regret it.


Notes:
Gloop is fairly easy to clean up since any stray pieces turn powdery (so cool!) and can be swept up. However, I do suggest doing this one on a hard surface and not a carpet.

We stored our gloop in a Tupperware dish for about a week until it started to smell a little funky.

I don't know if I will ever again be able to eat any recipe that uses cornstarch.

Tuesday, June 1, 2010

Crystal Trees


Isn't it, uh, crystal-y?


You will need:
  • Thin shirt cardboard
  • Deep saucer or small bowl
  • Small jar with a tight-fitting lid (I used a small Tupperware container.)
  • 1 tablespoon salt
  • 1 tablespoon bluing (found in the laundry detergent section of stores)
  • 1/2 tablespoon household ammonia
  • Food coloring (optional) It's supposed to tint the crystals.

How to:
  1. To create a tree base, cut two cardboard tree shapes (about 4-inches tall, 3-inches across at the widest part). Cut a 2-inch slot in the top of one tree and at the base of the other. Join the trees at the slots and stand in saucer or bowl. (If adding food color, squirt it onto cardboard just before placing in dish.)
  2. In jar, combine 1 tablespoon water, salt, bluing and ammonia. (For those of you too stupid, uninformed to know, handling ammonia is an adult's job.) Fasten lid and shake well. Pour solution into saucer or bowl.
  3. Leave tree undisturbed. Crystals should start forming anywhere between an hour or, um, never, depending on the humidity in your house. (The less humid, the better.) They SHOULD continue to grow for the next few days.

Thoughts:
Well, another craptastic one! I was really excited to try this one because the picture looked really cool-a little miniature crystal forest! Pretty. Pretty. Pretty? So not pretty. There wasn't anything The Boy could really help with, but he was really interested in it, none the less. Everyday we checked on our tree to find...nothing. A couple of random "crystals" appeared on the dish we used, but I have a strong suspicion my husband accidentally spilled salt on it because that's what it looked like. (Speaking of my husband, when we started this crap, I mean craft, he told me that he had done the same thing as a child-without the trees, using the recipe on the bluing bottle. We will eventually revisit this using that recipe to see if we have different results.)

Can I tell everyone how incredibly happy I am that I now own a large keg-o-ammonia purchased just to get my 1/2 tablespoon for this project?

Once you're through with this one/give up on any crystals forming, all the ingredients are safe to throw away.