Pages

Friday, April 22, 2011

Glass Magnets


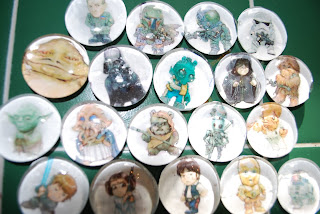
Glass magnets with our favorite Star Wars guys!

You will need:
  • Clear glass stones (You'll find them in the floral section of the craft store.)
  • Magnets (Use the appropriate size for your glass. If you use a too-small magnet the glass will just drag it right off the fridge!)
  • Images of your favorite characters. (Is anyone surprised we used these adorkable Star Wars ones we found online?)
  • Mod Podge
  • Craft stick/Popsicle stick
  • Paintbrush (if using an ink printer for your images)
How to:
  1. Unless you are using a laser printer, you will need to "quick-finish" your images before starting this craft. Don't be alarmed, it's very simple! Just place a few drops of Mod Podge on your paint brush and very quickly brush a light layer over your prints. Let dry. (About 15 minutes)  Repeat on back side. This will give your pictures a shiny coat of protection that will prevent them from leaking and fading. (I actually painted a few layers on each side for an extra seal.) Trust me...don't skip this step!
  2. Place stones over each image and trace around it. Cut image out.
  3. Place a few drops of Mod Podge on craft stick and rub on to flat side of stone. Place stone over image. (You should be able to see the image through the stone. Press gently, but firmly to remove any air bubbles.
  4. Place a few more drops of Mod Podge on magnet and place glass on magnet. Press firmly. Let dry.
  5. Trim any excess paper from edges. Repair any peeling pieces with a bit more Mod Podge.
  6. Cool tip: Paint the back of your magnet with clear nail polish to prevent it from marking your fridge.
Thoughts:
Where did we get the idea for this super awesome craft? http://www.starwars.com/ Check out their Kid's Crafting Blog if your little one is into Star Wars!

Love it!! What a cool craft and it was fun to do. Elliott's obsession with Star Wars is reaching the, well, obsession phase and why not go with it? (Oh, and by the way, be prepared for many more upcoming Star Wars crafts. We have a birthday coming up next month and I bet everyone knows the theme!) These magnets are so flippin' awesome. They look like something you'd pay good money for. Our first go round I didn't use the "quick-finish" method and an hour after doing them, the images had faded so much you could barely tell what they were supposed to be. Lesson learned.

Elliott got a bit bored with the glue, so I eventually had to take that part over, but he was totally into deciding which character we were doing next. And there was a method, believe me! "Right after Han you have to do Chewie, because they are best friends. And then you better do Leia because Han loves her. And then the Ewoks because Leia is friends with them..."

Elliott LOVES these magnets and plays with them every. Single. Day. Seriously. His favorite pastime is to sit at the kitchen table with all the magnets face down and I have to call out a character for him to locate. Or I have to call out which character he has to put back on the fridge. Or he'll pull the characters off and match them with the action figures that he has. Or divide them into groups of dark side/light side, droid/human, Jedi/alien, bad guy/good guy. He has found so many different things to do with these magnets that this will probably become one of the best crafts we have ever made!

Elliott's Evaluation: I loved doing it! Doing the mod podge was kind of boring, but I REALLY liked picking which character we were going to do next!

Saturday, April 16, 2011

Color Wheel Banner


You will need:
  • Thin cardboard (We used a cereal box.) cut into circles
  • Magazines
  • Glue, slightly watered down
  • Paintbrush
  • Yarn
  • Hole punch
How to:
  1. Decide what colors you are going to do for your banner. Leaf through magazines and tear out any pages that contain those colors. Tear those pages into smaller pieces and keep colors separated. (I found the best luck in an old issue of Birds and Blooms magazine. There were tons of nature, bird, and flower pictures to choose from.)
  2. Using paintbrush, paint a thin layer of glue on to cardboard. Lay pieces of paper from one color pile on cardboard, layering and reapplying glue as needed. When completely covered, set aside to dry.
  3. Repeat with remaining color piles.
  4. Once dry, trim any hanging pieces of paper off edges of circles.
  5. Punch two holes at top of each circle, thread yarn through holes and hang.
Thoughts:
Elliott loved looking through the magazines for his colors and tearing them out. We probably could have made this a two day project and focused just on the tearing the first day. (I would recommend it. The tearing actually takes longer than you think it will.) Both of us liked "painting" the paper on.

Cute, but what do you do with it?

The banner is really cute, but I really haven't found a place for it yet. First we hung it in a window, but the sun blocked us from seeing the bright colors. I moved it to a shelf, but it's just hanging there. Elliott's not willing to part with it yet, so it'll remain there for a while longer.

Elliott's Evaluation: I liked tearing the magazines. First we put the glue on and then we put the paper on. It was just for a decoration. It's a good decoration.

Friday, April 8, 2011

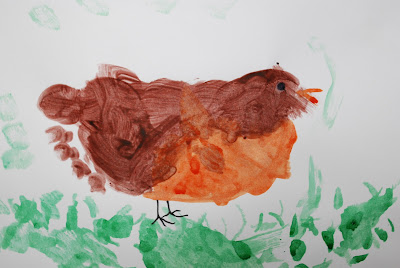
Spring Robin


Make a Spring Robin with your foot!
 You will need:
  • White paper
  • Brown, orange and green paint
  • Paintbrush
  • Black marker or crayon
  • One clean, bare foot
  • Baking sheet (to contain any messes)
How to:
  1. Place paper on baking sheet.
  2. Paint bottom of child's foot with brown paint. Help child to step on paper. (You'll probably have to fill in some areas with more paint.)
  3. Paint an orange belly on Robin. (Since Elliott hasn't quite mastered coloring in lines, I painted a quick line to give him an idea of the area to fill in.) Add a beak.
  4. Add some grass. (And flowers if you want...we aren't that advanced.)
  5. Once paint is dry, add feet and an eye with the marker.
Thoughts:
I found this idea at http://www.momentsofmommyhood.com/ and I'm so glad I did. This Robin is so freaking cute and makes me smile every time I pass it. The craft is really easy and only takes a couple of minutes, so it's a great one if you're a bit pressed for time.

Elliott loved getting his foot painted and has already requested that we make a few more of these and I will be happy to do so. What a sweet craft!

Elliott's Evaluation:
It tickled when Mommy painted my feet! I like to hold my painting up in the window for the birds outside to see. But I don't want to scare them so I stay quiet. We are going to make some more of these.

Friday, April 1, 2011

Jabba the Hutt Sculpture

Even you get crafted sometimes, Jabba!

You will need:
  • 1/2 cup flour
  • 1/2 cup salt
  • 1/4 cup water
  • Large bowl
  • Mixing spoon
  • Sharp knife
  • Paint (We used green, yellow, brown, orange and black.)
Recipe sound familiar? We halved the ingredients from this craft: http://craptasticcrafts.blogspot.com/2010/10/ghost-sculptures.html to make Jabba.

How to:
  1. In a large bowl, mix flour, salt and water until dough forms.
  2. Shape dough into desired shape, making sure to flatten the bottom of sculpture so it will stand. Use knife to carve features into sculpture. If you make a mistake, just smooth dough out and redo.
  3. 
    
    Jabba before being painted.
     
  1. Place on a microwave safe plate and cook at 20-30 second intervals for about 2 minutes, until dough hardens. (I ended up cooking ours for about 3 minutes, maybe a bit more. Since the sculpture was so much larger it took a bit more time to harden.) CAUTION: Dough gets very, very hot in microwave!! Let cool before handling.
  2. Once completely cool, paint sculpture to look like Jabba.


A rare photo of me and Elliott crafting together!


Jabba's Colors:
Mix yellow and a small amount of brown for Jabba's front.
Green for his back.
Jabba's back
 
Orange and black for his eyes.
Close up of Jabba's face

Thoughts:
Why the vile gangster Jabba the Hutt? Well, for one thing, you don't find too many action figures of Jabba. For another, Jabba has a relatively easy shape to work with. This is, by far, one of the crafts that I am most proud of. Not only does Jabba look freaking awesome, he gets so much play time that Han Solo would be ashamed. Cooking Jabba in the microwave flattened him quite a bit from what the original sculpture was, so keep that in mind. (I would make him a bit taller than you think he needs to be.)

Elliott's Evaluation:
I really liked painting him. I wanted him to have a smile, even though he's a bad guy. He is one of my favorite action figures. Why did Jabba capture Princess Leia? I think it's because he's mean.