Pages

Showing posts with label pom poms. Show all posts

Friday, December 17, 2010

Celebration Christmas Tie

Go ahead and tie one on this Christmas!


We got the inspiration for this craft from www.Disneyfamily.com as a promo for their new(ish) Christmas movie Prep and Landing. Wayne the elf wears it to celebrate his (he thinks) imminent promotion. The Disney website has a template for the Christmas tree that you can print off for those of you who are artistically challenged. (They also have side bar ads for Busty Russians who want to meet me, which I thought was highly inappropriate for a "Family" website, but let's not go there...)

What you need:
  • One sheet of green felt
  • Fabric glue
  • Embellishments (we used pom-poms and sequins)
  • Safety pin
How to:
  1. Cut tree shape out of green felt, about one foot long.
  2. Cut additional shape for "necktie" portion of tie. (Again, I suggest the template on Disney's website, but, basically it's a very thick U-shape about 1 and 1/2" in height by 4" in width.)
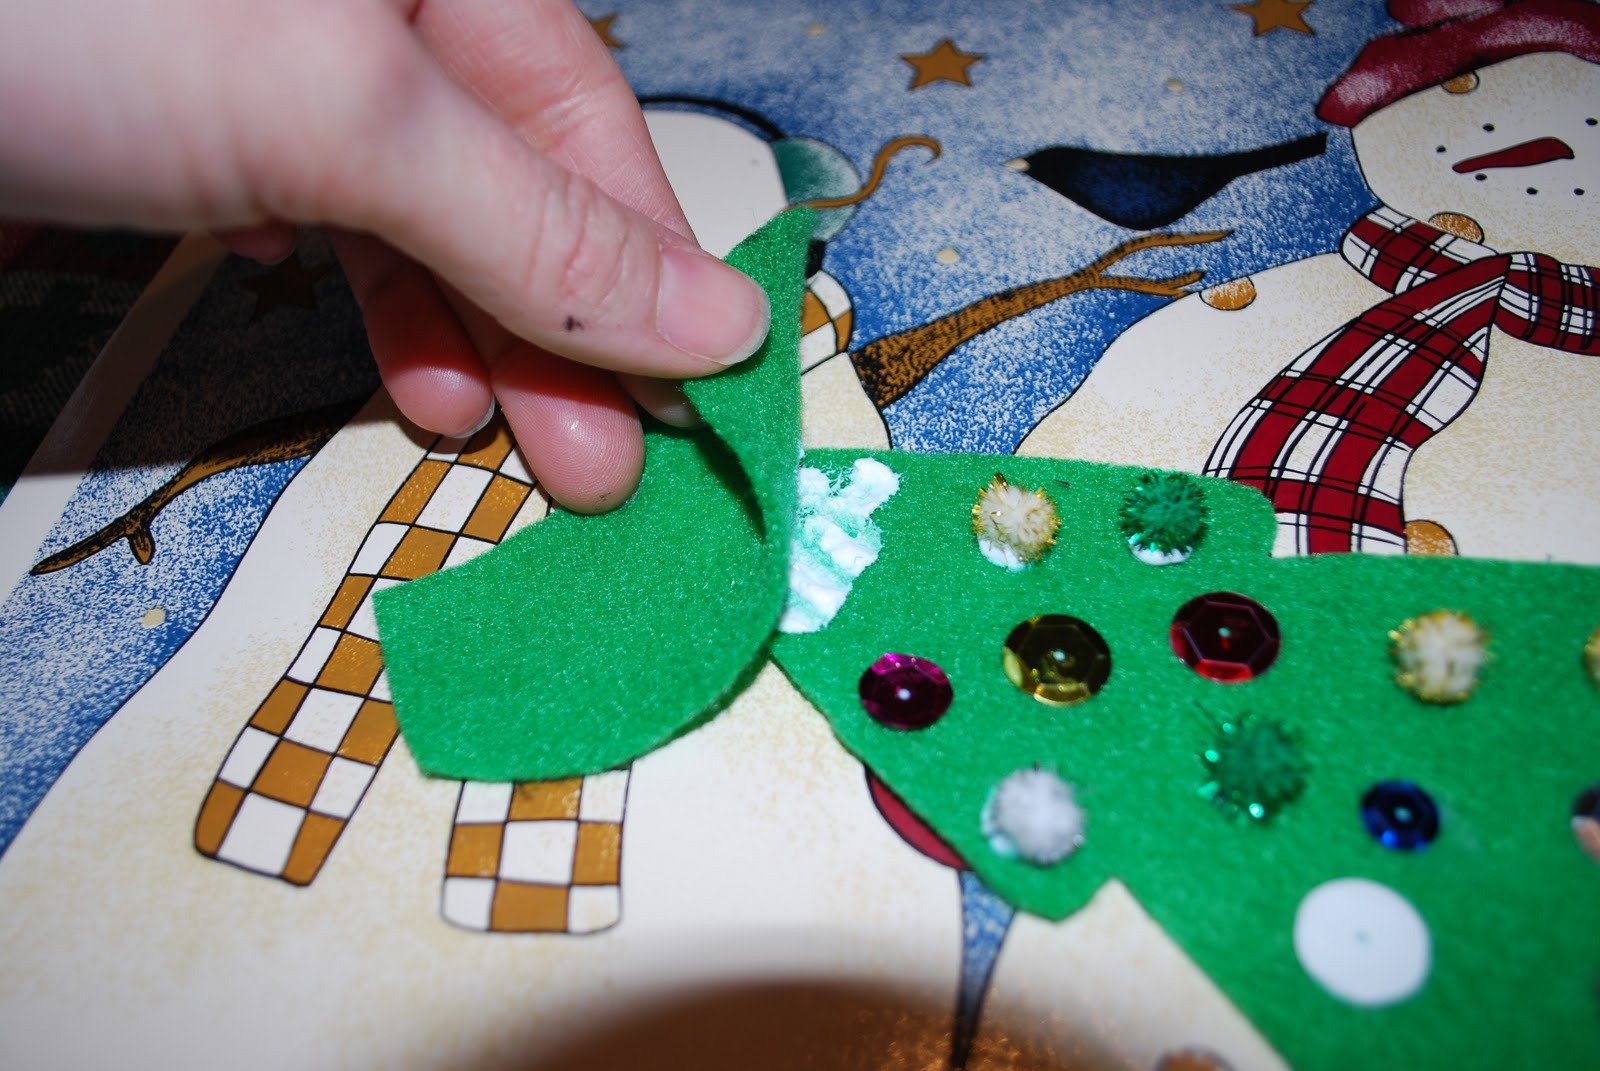
  3. Glue portion of felt over top part of tree, fold the ends over and glue ends down. (For those of you following my pictures, this is not the order I did it in. But you should. It will be easier to do it now so you can press down as much as you need without worrying about the embellishments on your tie.)
  4. 
    Backside of tie showing only one end glued down.
    
    Both ends glued down.
  5. Decorate tie with any embellishments you want. We used pom-poms and sequins, but you could use glitter glue, beads, ribbon, etc.
  6. Let dry and pin on.
  7. Look cool!
Thoughts:
This was so cute and very fun to make. Fabric glue and felt are not the best of friends and after trying to attach the necktie portion to the tree portion I wasn't on friendly terms with either of them. But, eventually they do dry and hold together quite well. Be generous with the glue if attaching pom-poms. Most seemed like they were hanging on by a thread. A couple of the sequins popped off after one wear, but it's an easy fix.

Elliott's Evaluation:
I wore my Christmas tie to school and my teacher's loved it. I really liked making it and I put some of my favorite colors and some of Mommy's favorite colors on it.


Monday, July 12, 2010

Easter Chicks

These cute chicks go perfect with the Egg Nest.

You will need:
  • Yellow pom-poms (We used two large and one small)
  • Black seed beads
  • Tweezers
  • Glue
  • Orange felt

How to:
  1. Cut the orange felt into diamond shapes, fold in half and place glue on the crease. Glue onto pom-poms for beaks. We had some trouble getting the felt to stick to the pom-pom, but after many attempts, the glue hardened enough to make the next try stick.
  2. Holding seed beads with tweezers, dip into glue and place onto pom-poms for eyes.


Thoughts:
This craft isn't exactly kid (i.e. 3 year old) friendly, but I've included it because the birds look so cute and look great in the nest. Young children can help to fold the diamonds in half to form the beaks and choose where to place the beaks and eyes.

Seed beads! I had no idea what they were, and after a good 20 minutes or so of hunting them down at the craft store, finally found them in the (duh) bead aisle. For those of you, like me, who don't know, they are those little teeny tiny beads that people use to make beaded jewelry. Who knew?

Thursday, April 29, 2010

Tissue Paper Mural

Wondering about my blog name? This artwork is a prime example of craptastic!

You will need:
  • Cardstock or construction paper
  • Tissue paper (or construction paper) in different colors, torn into pieces
  • Glue
  • Paintbrush
How to:

  1. Water down the glue slightly.
  2. With the paintbrush, "paint" the glue mixture onto paper.
  3. Place tissue paper wherever!


Thoughts: I was soooo disappointed with how this art turned out:


But, seriously, what was I thinking it would look like?  Apparently I was picturing this amazing , frame-worthy, 3-dimensional sculpture. Uh, not so much. So, here's the point: Elliott loved tearing apart the paper, mixing the glue and water and especially painting the glue mixture onto the paper. Placing the tissue paper lovingly and thoughtfully in artfully arranged scenes was supposedly not on the menu. After patting, OK, slamming a few pieces on, he called it a day. Would I do it again? In a heartbeat. Do I have this "art" framed anywhere in the house? Uh, no.

Optional: Want to make it more craptastic? Before the glue dries, add glitter, pom poms and googly eyes.

Want to be rid of the artwork but not throw it away? Crop the art, being sure to include any parts with googly eyes and add sayings like "Eye hope you're feeling better", or "Eye am thinking of you", etc. Fold paper in half and send to that unsuspecting relative who won't have the heart to throw away any of Junior's art. Suckers.